
Blog
Guides About Share a VPN Connection via Mobile Hotspot on Windows 10

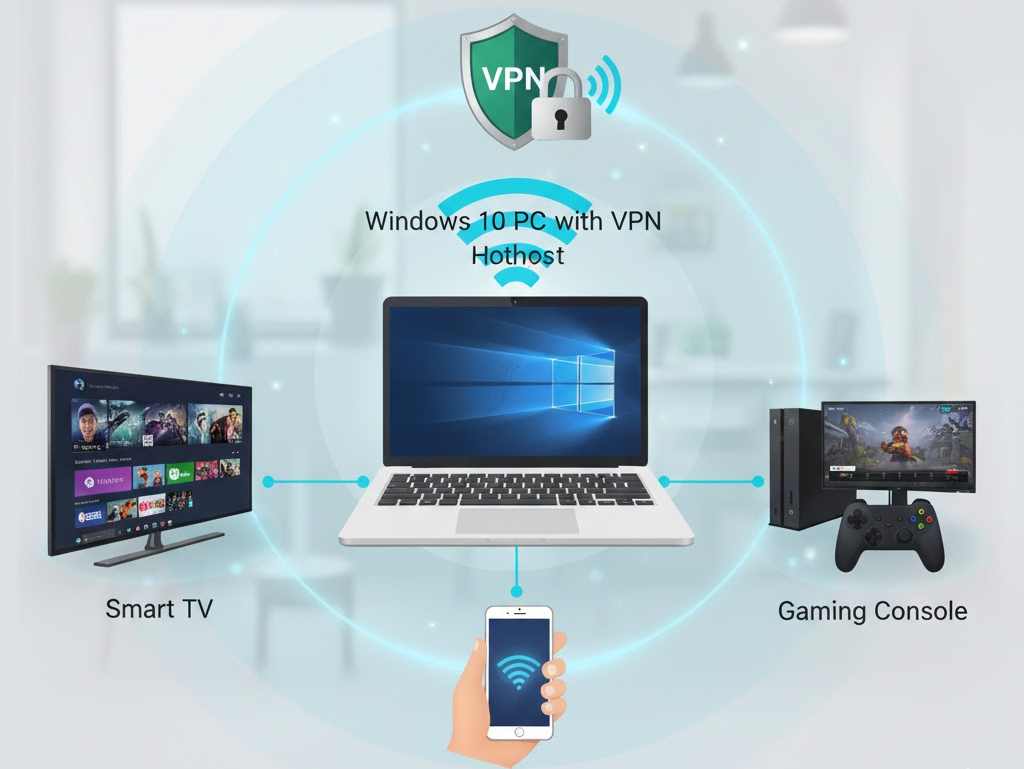
Sharing a VPN connection from your Windows 10 computer via a mobile hotspot enables other devices to benefit from VPN protection without requiring the installation of VPN apps on each one. This is especially useful for devices that do not support VPN software directly, such as smart TVs, gaming consoles, or Chromecast.
In this comprehensive guide, you will learn how to share your VPN connection through a mobile hotspot on Windows 10 using simple, clear steps. This method is practical, secure, and can be done without special hardware.
Why Share a VPN Connection
A Virtual Private Network (VPN) adds security, privacy, and location flexibility to your internet connection. Sharing it through a hotspot means every device connected to that hotspot automatically gets the same protection.
Benefits of Sharing a VPN Connection
| Benefit | Description |
|---|---|
| Secure all devices | All devices connected to your hotspot will be protected by the VPN. |
| Access geo-blocked content | Stream or browse content available only in other regions. |
| Save bandwidth | One VPN connection can serve multiple devices simultaneously. |
| Protect devices without VPN apps | Ideal for smart TVs, game consoles, and IoT devices. |
| Easy to manage | You only manage one VPN connection instead of installing it on every device. |
Expert Insight: Sharing a VPN through a hotspot is often more efficient than setting up individual VPN apps for each device, especially when dealing with devices that lack VPN support.
What You Need Before You Start
Before setting up a VPN hotspot on Windows 10, make sure you have the following:
| Requirement | Description |
|---|---|
| Windows 10 PC or laptop | Acts as the VPN router or host. |
| Active VPN subscription | Choose a reliable VPN provider like NordVPN, ExpressVPN, or ProtonVPN. |
| Wi-Fi adapter | Most modern laptops have built-in Wi-Fi adapters suitable for hotspot sharing. |
| Administrator access | Needed to change network settings and enable sharing. |
| Stable internet connection | To prevent disconnections for connected devices. |
Optional but recommended:
- Ethernet connection (for improved stability)
- VPN app installed and configured
- Updated Wi-Fi adapter drivers
Step 1: Enable Mobile Hotspot in Windows 10
The first step is to turn on the built-in Mobile Hotspot feature in Windows 10. This enables your PC to function as a Wi-Fi access point for other devices.
How to Turn On Mobile Hotspot
- Click Start and open Settings.
- Select Network & Internet.
- Click Mobile hotspot in the left menu.
- Turn on Share my Internet connection with other devices.
- Under “Share my Internet connection from,” choose Wi-Fi.
- Click Edit to set:
- A Network name (e.g., My VPN Hotspot)
- A Password (use a secure one)
- Save the settings.
Recommended Hotspot Settings
| Setting | Example Value | Note |
|---|---|---|
| Network name | My VPN Hotspot | Use a unique, easy-to-identify name |
| Password | strongpass123 | Avoid personal information or common passwords |
| Network band | 2.4 GHz or 5 GHz | 5 GHz is faster, but only works with compatible devices |
Practical Tip: If you have multiple devices or large files to stream, opt for the 5 GHz band for improved performance.
Step 2: Connect to Your VPN on Windows 10
Before sharing the VPN connection, ensure your PC is connected to the VPN.
Option 1: Using the VPN App (Recommended)
- Open your VPN application.
- Sign in with your account.
- Select a preferred server location.
- Click Connect.
Option 2: Using the Windows Built-in VPN Feature
- Open Settings → Network & Internet → VPN.
- Click Add a VPN connection.
- Fill in the required fields:
- VPN provider: Windows (built-in)
- Server name or address: provided by your VPN service
- VPN type: typically L2TP/IPsec or OpenVPN
- Save and click Connect.
Expert Insight: Official VPN apps usually provide better encryption, faster speeds, and built-in kill switches compared to manual setup.
Step 3: Enable Internet Connection Sharing (ICS)
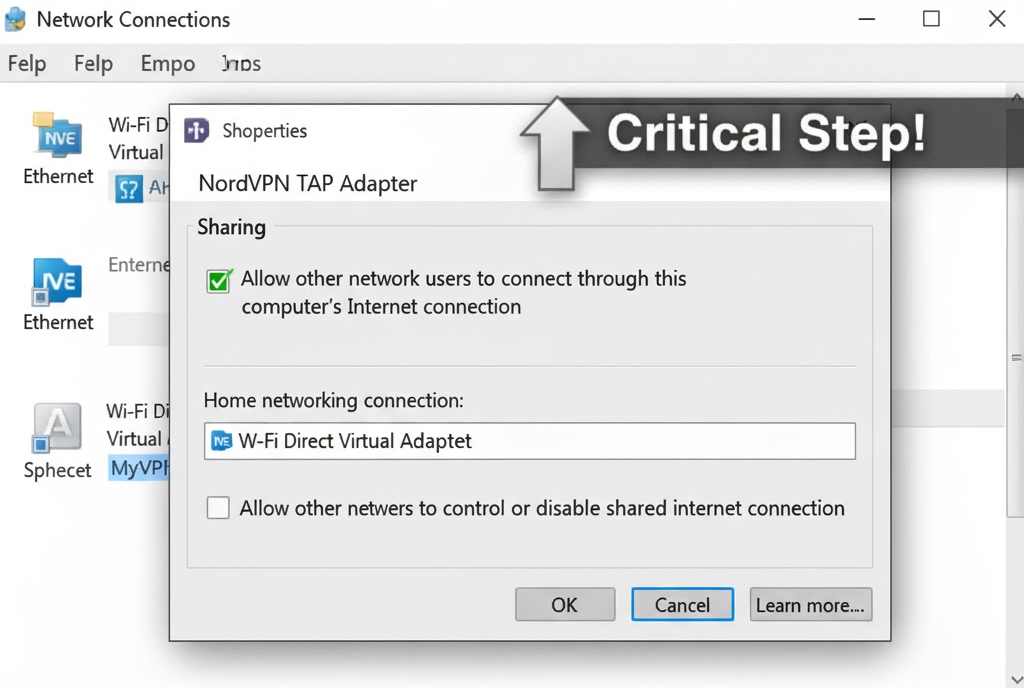
Internet Connection Sharing allows your PC to route VPN traffic through the hotspot. This is the critical step.
How to Enable ICS
- Press Windows + R, type ncpa.cpl, and press Enter to open Network Connections.
- Right-click your active VPN connection and select Properties.
- Open the Sharing tab.
- Check the box Allow other network users to connect through this computer’s Internet connection.
- In the dropdown menu labeled Home networking connection, select your Mobile Hotspot adapter (usually listed as “Local Area Connection*” or “Microsoft Wi-Fi Direct Virtual Adapter”).
- Click OK.
ICS Configuration Table
| Setting | Description | Example |
|---|---|---|
| Allow other network users | Enables VPN sharing | Checked |
| Home networking connection | Selects which adapter shares the VPN | Wi-Fi Direct Virtual Adapter |
| VPN Adapter | The active VPN interface on your PC | TAP Adapter, NordLynx, OpenVPN Adapter |
After applying these settings, the VPN connection should show a “Shared” status in the Network Connections window.
Step 4: Connect Other Devices to the Hotspot
Once the VPN and ICS are active, any device connecting to your hotspot will automatically use the VPN connection.
How to Connect a Device
- On the target device (phone, tablet, smart TV), go to Wi-Fi Settings.
- Find the hotspot network name you created (e.g., MyVPNHotspot).
- Enter the password.
- Connect.
To verify the connection:
- Visit https://whatismyipaddress.com on the connected device.
- If the VPN is working, the IP location should match the VPN server’s location, not your actual ISP’s location.
Practical Tip: Run a speed test using Speedtest.net on the connected device to ensure stable performance.
Troubleshooting Common Problems
Sometimes hotspot sharing may not work as expected. Here are common issues and solutions.
| Problem | Cause | Solution |
|---|---|---|
| Hotspot won’t turn on | Driver or adapter issue | Update Wi-Fi drivers or use Windows Troubleshooter. |
| VPN works on PC but not on devices | ICS not enabled correctly | Check ICS settings and ensure correct adapter is selected. |
| Slow speed | Poor Wi-Fi signal or distant VPN server | Use 5 GHz band, switch to a closer VPN server, or reduce device count. |
| No internet on connected devices | DNS conflict or network error | Restart hotspot and VPN, flush DNS using ipconfig /flushdns. |
| TAP adapter missing | VPN client installation problem | Reinstall VPN client or manually install TAP adapter. |
Expert Tip: If Wi-Fi is unstable, use an Ethernet cable to connect your PC to the internet, and use the Wi-Fi adapter only for hosting the hotspot.
Step 5 (Optional): Use Command Prompt to Manage Hotspot
For advanced users or in cases where the Windows Settings panel fails, you can manage the hotspot using the Command Prompt.
Check Hosted Network Support
netsh wlan show driversLook for:
Hosted network supported: YesIf it says “No,” update your Wi-Fi adapter or use a USB Wi-Fi dongle that supports hosted networks.
Create a Hotspot Manually
netsh wlan set hostednetwork mode=allow ssid=MyVPNHotspot key=strongpass123
netsh wlan start hostednetwork
Check Hotspot Status
netsh wlan show hostednetworkStop Hotspot
netsh wlan stop hostednetworkPractical Tip: Command-line configuration often bypasses GUI bugs and provides more control over hotspot settings.
Tips for a More Stable VPN Hotspot
Sharing a VPN connection through a hotspot works best with a few adjustments. Below are proven methods to improve performance.
- Use a wired Ethernet connection for your PC when possible.
- Keep your hotspot password strong and unique.
- Restart your VPN and hotspot after making configuration changes.
- Select a VPN server located near your physical location for optimal speed.
- Limit the number of connected devices.
- Position your PC close to the router to maintain a strong Wi-Fi signal.
- Turn off unnecessary background apps to free up bandwidth.
| Tip | Benefit |
|---|---|
| Wired Ethernet | More stable and faster base connection |
| Strong password | Prevents unauthorized hotspot access |
| Limited connected devices | Reduces lag and improves speed |
| Nearby VPN server | Lower latency and higher performance |
| Regular restarts | Resolves temporary network issues |
Alternative Methods to Share VPN on Windows 10
If sharing VPN through the default hotspot method does not work, here are alternative approaches.
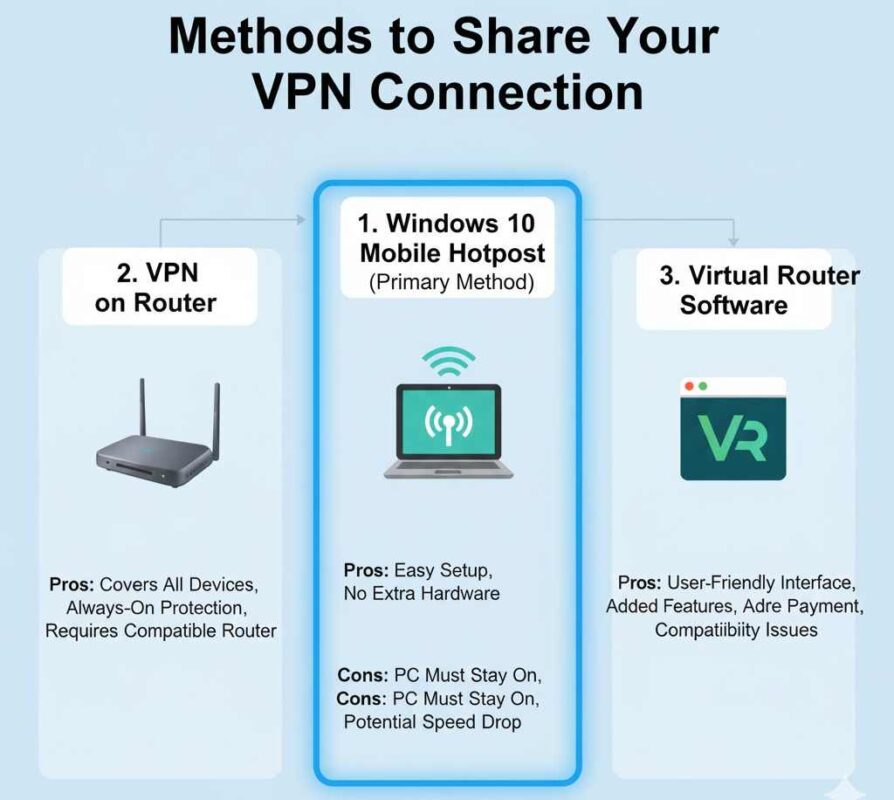
1. Install VPN on Your Router
Many premium VPN providers support router installation. Once installed, all connected devices automatically use the VPN connection.
- Pros: Stable, secure, covers every device in the network.
- Cons: Requires a compatible router and a more complex setup.
Useful resources:
- ExpressVPN Router Setup Guide
- NordVPN Router Setup Guide
2. Use Virtual Router Software
If your Wi-Fi adapter does not support hosted networks, third-party software like Connectify Hotspot can create virtual hotspots.
- Pros: Easy to use, additional features like bandwidth control.
- Cons: Some features require a paid version.
Official website: https://www.connectify.me/
3. Share VPN via Ethernet Cable
For wired-only devices such as some smart TVs and gaming consoles:
- Connect your PC to the device using an Ethernet cable.
- Enable Internet Connection Sharing for the VPN on the Ethernet adapter.
- The connected device will now use the VPN connection.
This method is often more stable than sharing a wireless hotspot.
Security Considerations
When sharing a VPN connection through a hotspot, your computer acts like a router. Securing the connection is crucial.
| Security Risk | Prevention Tip |
|---|---|
| Unauthorized access | Use WPA2 encryption and a strong password. |
| VPN disconnection or leaks | Enable the VPN kill switch or auto-reconnect feature. |
| Malware or intrusions | Keep Windows Firewall active and use updated antivirus software. |
| DNS leaks | Use the VPN provider’s DNS servers or configure DNS manually. |
Expert Insight: Always test for DNS and IP leaks using tools like https://www.dnsleaktest.com or https://ipleak.net.
Expert Tips for Long-Term Use
- Keep software updated. Regularly update Windows, Wi-Fi drivers, and your VPN client.
- Monitor data usage. Some ISPs throttle mobile hotspots, so it’s best to monitor usage through the Task Manager or your router.
- Use split tunneling. If your VPN provider supports it, route only specific traffic through the VPN to reduce load.
- Set a static DNS. Consider using a trusted DNS service, such as Google DNS (8.8.8.8) or Cloudflare (1.1.1.1), for added stability and reliability.
- Limit hotspot time. Long hotspot sessions can strain your network adapter; restart periodically.
Frequently Asked Questions (FAQ)
Can I share a VPN from Windows 10 to my phone or TV?
Yes. Once your PC’s VPN connection is shared via a hotspot, any connected device, including phones, tablets, or TVs, will use that VPN connection.
Do I need a special adapter?
Not usually. Most modern laptops and Wi-Fi adapters support hotspot sharing. If not, a USB Wi-Fi adapter that supports hosted networks will work.
Will my connection slow down?
Possibly. VPN encryption and routing may reduce speed. Using a nearby VPN server and Ethernet connection can minimize the slowdown.
Can I use this method with free VPNs?
Technically, free VPNs often have limitations on speed, capacity, or device usage. A premium VPN is recommended for stable performance.
Is it legal to share a VPN through a hotspot?
In most countries, yes, as long as you use the VPN for personal purposes and comply with local laws. Always check local regulations if unsure.
Authoritative References and Further Reading
For further technical details and security best practices, consider the following reputable sources:
- Microsoft Official Documentation on Mobile Hotspot
- Windows Network Sharing Documentation: https://learn.microsoft.com
Conclusion
Sharing a VPN connection through a mobile hotspot on Windows 10 is a practical solution for securing multiple devices at once. It’s beneficial for devices that don’t support VPN software directly. By enabling Mobile Hotspot, connecting to your VPN, and turning on Internet Connection Sharing, you can protect your entire household or workspace in just a few steps.
For best results:
- Use a wired connection for your PC.
- Choose a nearby VPN server.
- Keep your hotspot secure with a strong password.
- Regularly check your connection for DNS and IP leaks.
If the built-in method doesn’t work for your hardware, alternatives like router VPN installation, virtual router software, or Ethernet sharing offer additional flexibility.
With this guide, you can confidently and effectively set up and manage a secure VPN hotspot on Windows 10.